By using approval you can ‘lock’ the hour registrations and/or workplaces after they have been checked and approved by a manager.
Approval is configured in Master data | Employee. On the Approval tab of the Access tab can be set for which employees a manager can approve the hour registrations or workplaces. On the Approval tab for the selected employee/manager can be set up to which level an hourly booking or workplaces can still be edited, the maximum approval level that can be set and if leave can be approved.
Based on which aspect approval can be set can be edited at Settings | Approval. Also the colors and descriptions of the different approval levels can be edited here.
The usual way to approve bookings is as follows:
1.An employee books his or her hours/workplaces and set approval level ‘for approval’
2.The manager approves or disapproves the hour registrations by setting the appropriate approval level.
3.After hour registrations/workplaces have been approved they are locked.
When this approval screen is selected on the Hours tab all hour bookings and on the Workplaces tab all workplaces to which the logged on user has approval access will be shown for the active week. Normally an employee will only have access to his or her own hours/workplaces, but a manager gets the hours/workplaces of all aspects which for which he or she is authorised to approve. The employee list only contains employees for whom hour bookings and/or workplaces are actually found.
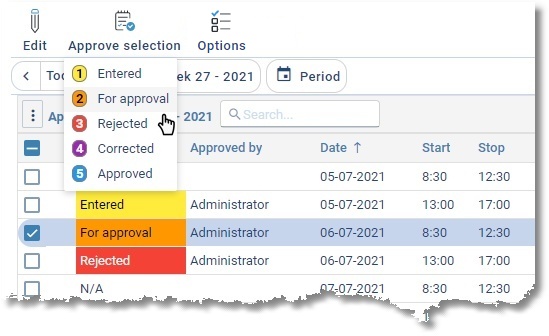
Set approval level
The approval level can be set as follows:
1.Select the Hours or Workplaces tab.
2.Select the hour booking(s)/workplace(s) that have to be approved by setting the checkbox in the Selection column.
3.Click on the Approve selection button to approve the selected hour booking(s)/workplace(s).
4.Select the approval level from the popup menu.
Use button ![]() to (automatically) adjust the column widths or to show/hide columns, grid title, search box or group panel.
to (automatically) adjust the column widths or to show/hide columns, grid title, search box or group panel.
By dragging and dropping a column header to the grouping panel above it, groupings and subgroupings can be created. The example below shows a grouping by employee. The mutual order of the columns can be adjusted by dragging the column headings, the width can be adjusted by changing the width of the column headings. The sorting of columns can be adjusted by clicking on the column header.
Grouping and sorting can also be done via the right-click menu of a column header.
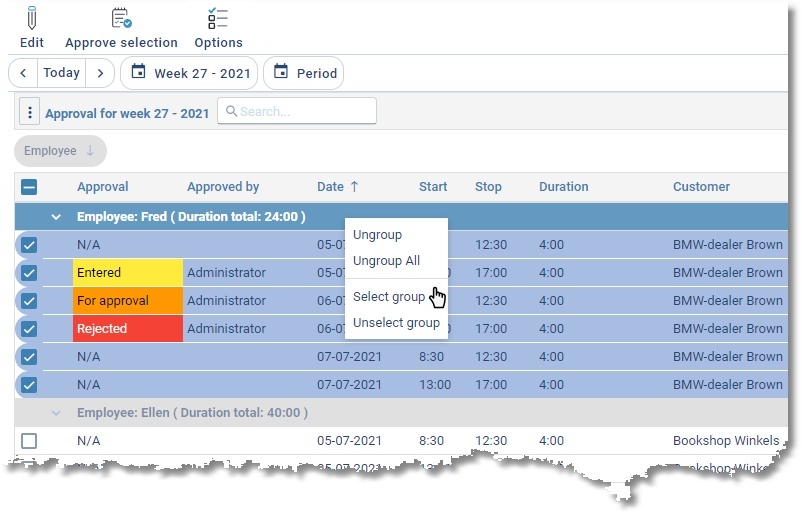
A group can be approved without first selecting all rows within that group. Right click the group row and choose Select group from the menu as shown in the example above. All child rows will be selected. After that you can select the approval level by pressing the Approve selection button or choose.
A different period can be selected to show hourly bookings/workplaces for approval. Click on the Period button to set the desired period in the screen below.
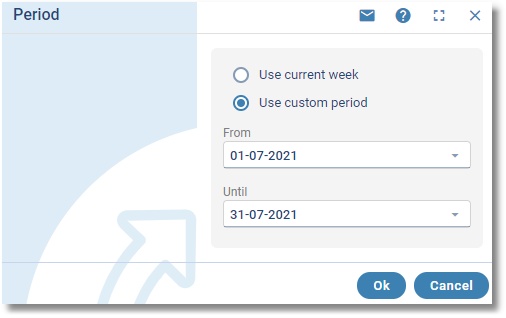
For bigger time periods it can take longer to load all hour booking or workplaces.
Several options for this screen can be set using the Options button:
- Show only employees with a valid period (in the employees grid)
- Show all employees in the details grid (hides the employees grid)